Introduction Windows 11 features major interface and under-the-hood changes. The changes include a new start menu, a redesigned taskbar, and...
Introduction
Windows 11 features major interface and under-the-hood changes. The changes include a new start menu, a redesigned taskbar, and Android app support. The OS is available as a free update for Windows 10 users.
Virtual machine software is a practical solution to test Windows 11 without upgrading your computer. With Windows 11 virtual machine, you can experience the operating system without affecting the existing OS installation.
Direct Download Windows 11 (*Leaked)
Prerequisites
- Windows 10 or Linux installed on your host computer.
- VMWare Workstation Player 16 installed.
- Windows 11 ISO file, available on the official website.
Install Windows 11 on VMware
Since Windows 11 is still a new operating system, installing it on VMWare Workstation Player requires minor workarounds, such as editing VM settings to match Windows 11 requirements.
However, the process is straightforward and consists of three steps:
- Creating a Windows 11 virtual machine.
- Configuring the VM.
- Installing Windows 11 on the VM.
Step 1: Create Windows 11 Virtual Machine
To create a Windows 11 virtual machine, launch VMWare Workstation Player and:
1. Select Create a New Virtual Machine in the main window.
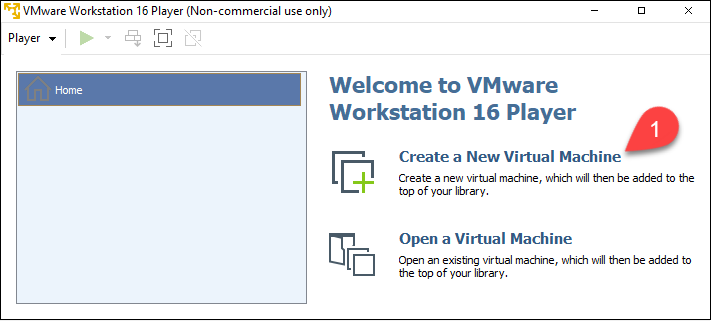
The New Virtual Machine Wizard starts.
2. Select the Installer disc image file (iso) option.
3. Click Browse and locate your Windows 11 ISO file.
4. Select Next.
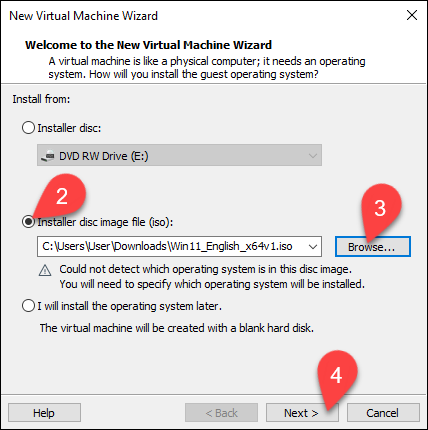
The Select a Guest Operating System window loads.
5. Select Microsoft Windows in the Guest operating system section.
6. Pick Windows 10 and later x64 from the dropdown list.
7. Select Next.
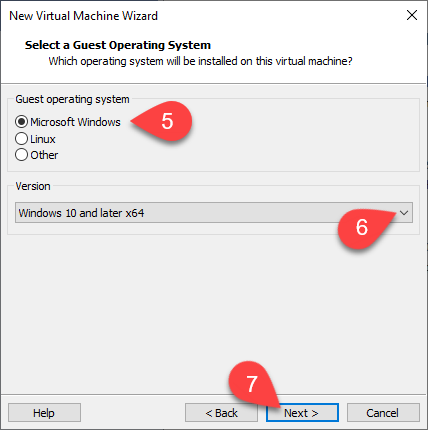
The Name the Virtual Machine window appears.
8. Type the name for the virtual machine. The example VM is named Windows11.
9. Click Browse to choose the location of the VM. Skip this step to use the tool's default location.
10. Select Next.
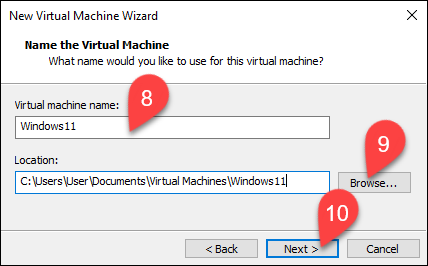
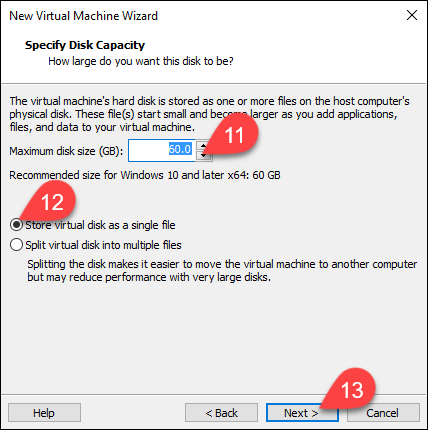
The Specify Disk Capacity window appears.
11. Choose the maximum disk size in gigabytes. Assign 60 gigabytes or more for the Windows 11 VM.
12. Select Store virtual disk as a single file option.
13. Select Next.
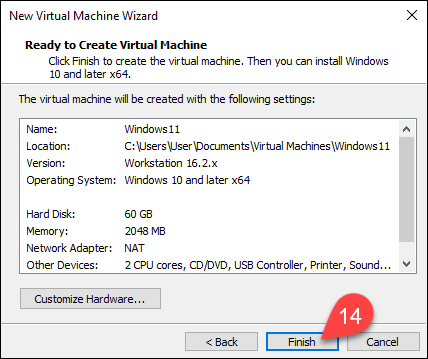
In the Ready to Create Virtual Machine window, you can see all the VM settings.
14. Select Finish to create your Windows 11 VM.
Step 2: Modify and Start Windows 11 Virtual Machine
Since the virtual machine has been created with Windows 10 and later x64 settings, edit the VM to satisfy Windows 11 minimum requirements.
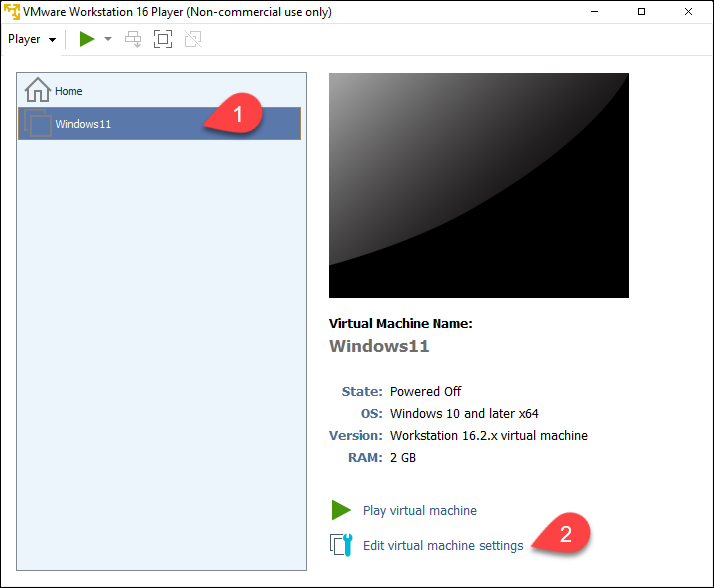
1. Select your VM in the list on the left side of the window.
2. Select Edit virtual machine settings.
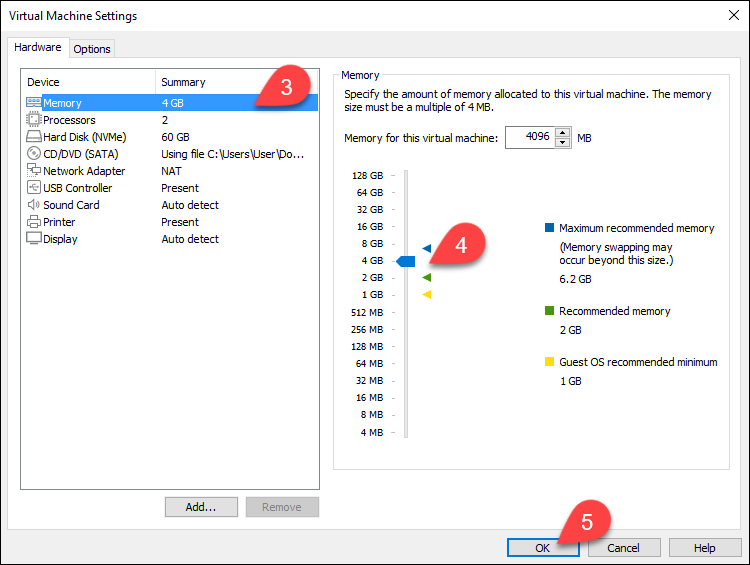
The Virtual Machine Settings window opens.
3. The menu on the left side contains the VM's virtual devices. Select the device you want to adjust.
4. Change the device settings in the section on the right side of the window.
Note: To satisfy Windows 11 requirements, set at least 4 GB of memory and two processor cores.
5. Select OK when you finish setting up your VM.
6. Select Play virtual machine in the main VMWare Workstation Player window.
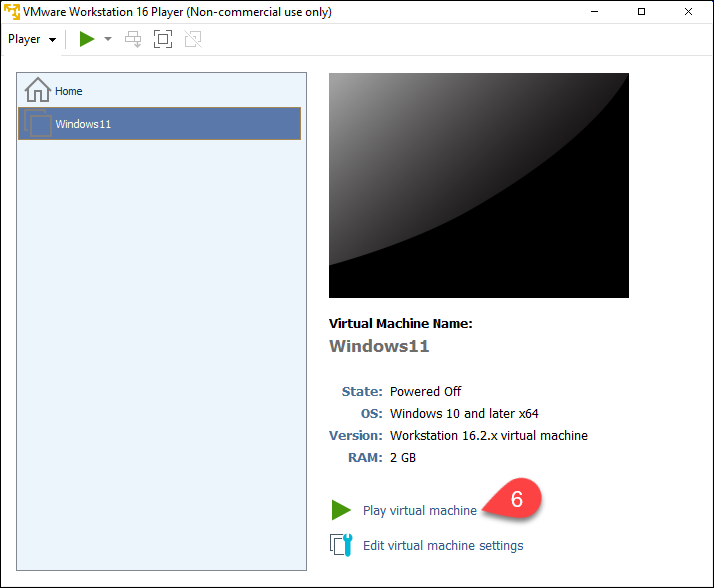
The VM window opens.
7. Press any key while in the VM window to boot the ISO file.
Step 3: Install Windows 11
The Windows 11 installation process inside the VMWare Workstation Player is the same as installing Windows 11 directly on the hardware.
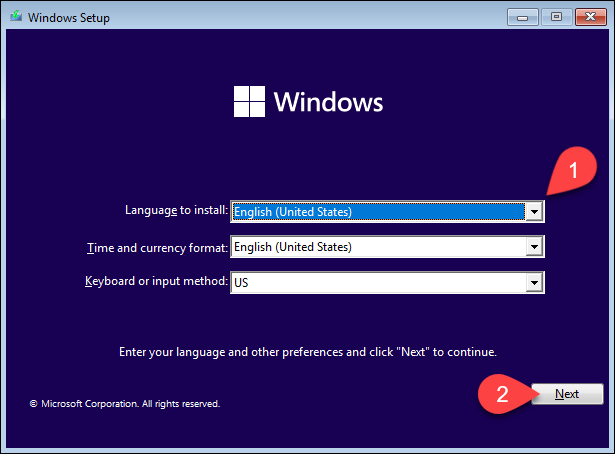
1. Pick the language of the installation, the time and currency format, and the input method from the dropdown menu.
2. Select Next.
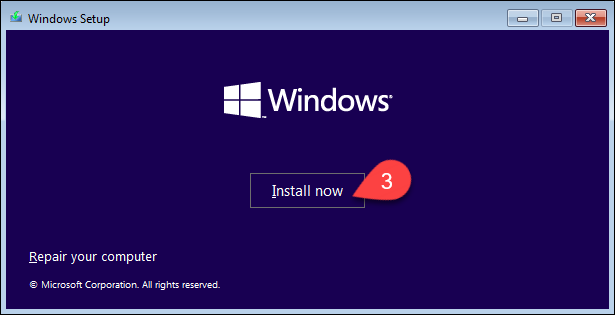
3. Click Install now.
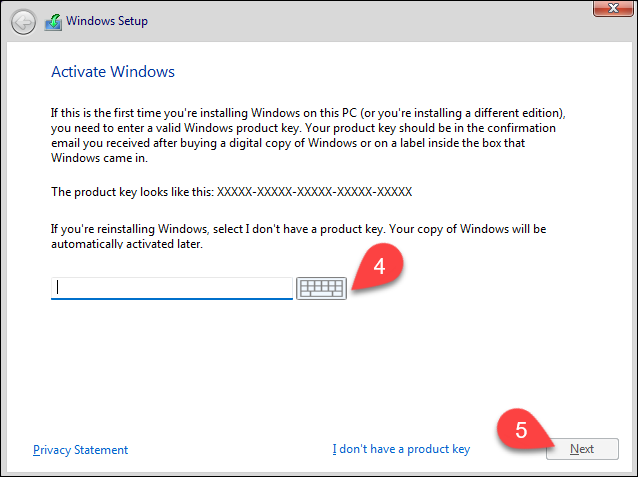
The Activate Windows window appears.
4. Enter the product key in the box, or click I don't have a product key. Choosing I don't have a product key takes you to the next window.
5. Select Next.
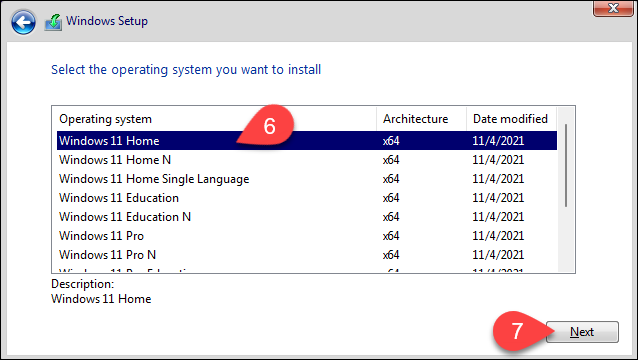
The window with a list of operating system versions appears.
6. Pick the Windows 11 version you want to install.
7. Select Next.
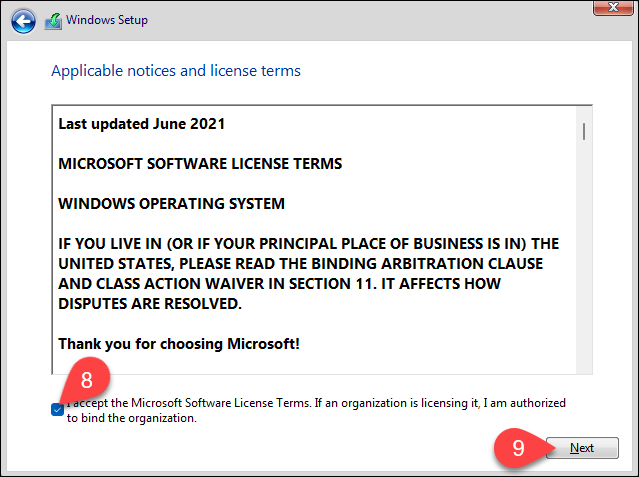
The Applicable notices and license terms window opens.
8. Select the checkbox to accept the Microsoft Software License Terms.
9. Select Next.
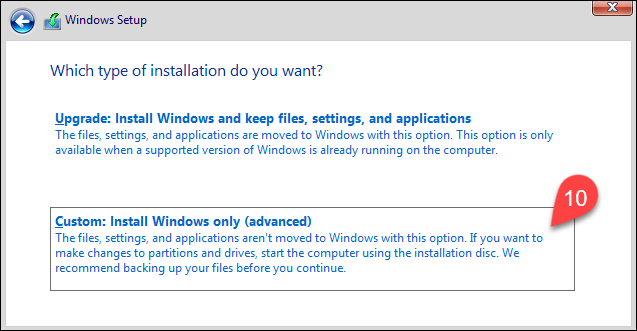
The following window contains installation options.
10. Choose Custom: Install Windows only (advanced) option.
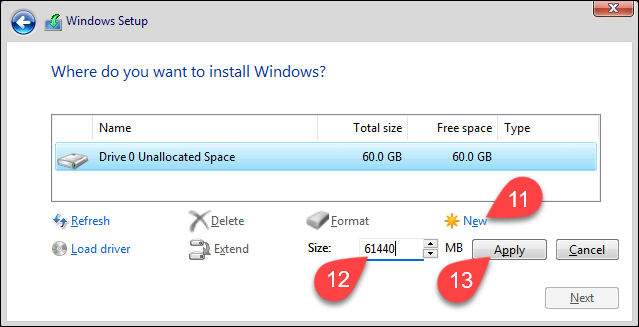
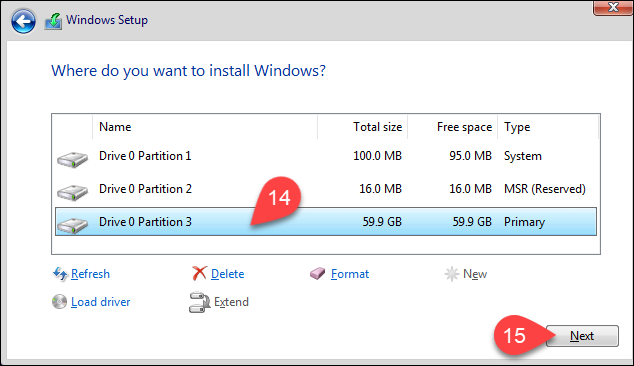
The window with partition information appears.
11. Select New to create a new partition.
12. Pick the size of the partition. Windows uses the entire unallocated space if you do not specify the size.
13. Select Apply to let Windows create the partitions.
When Windows finishes creating the partitions, the complete partition list appears.
14. Pick the partition marked as Primary from the partition list.
15. Select Next.
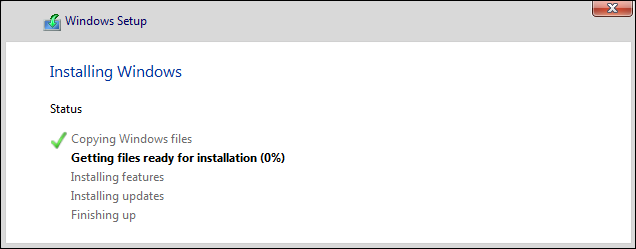
The Windows 11 installation starts. Follow the installation progress in the Installing Windows window.
(Optional) Bypass the TPM Check
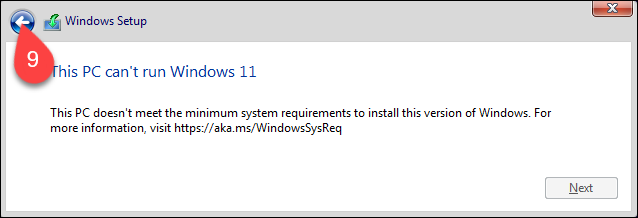
If your machine does not meet minimal requirements for Windows 11 installation, the This PC can't run Windows 11 message appears instead of the Applicable notices and license terms window.
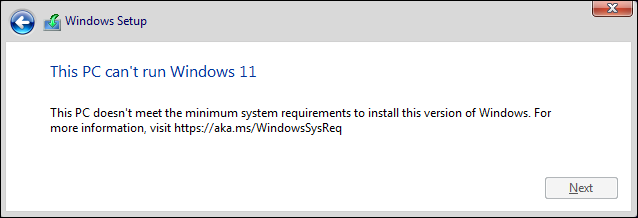
If you still wish to test Windows 11 on the same machine, you can override the Trust Platform Module (TPM) check preventing you from continuing with the installation.
To do so:
1. Press Shift + F10 to open the command prompt.
Note: On some keyboards, you have to press Shift + Fn + F10.
The command prompt opens.

2. Open the Registry Editor by typing:
Press Enter to confirm. The Registry Editor appears.
3. In the navigation menu on the left side of the window, go to HKEY_LOCAL_MACHINE>SYSTEM>Setup. Right-click Setup, hover over the New option in the context menu, and select Key from the sub-menu.
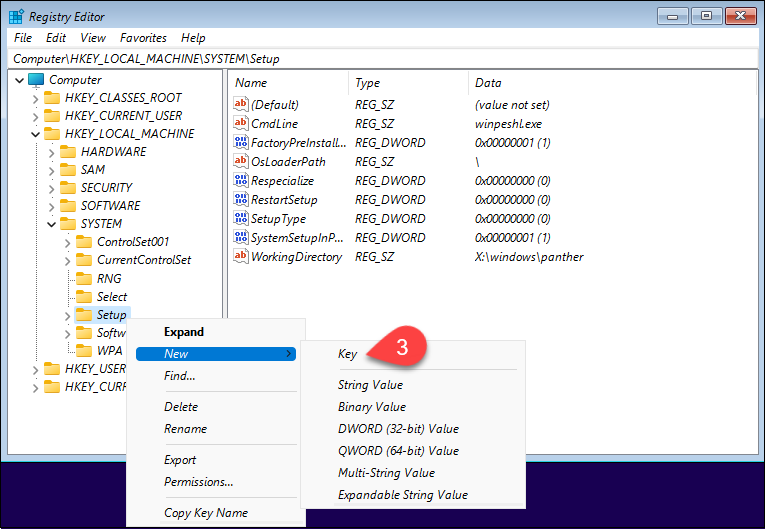
When prompted, name the key LabConfig.
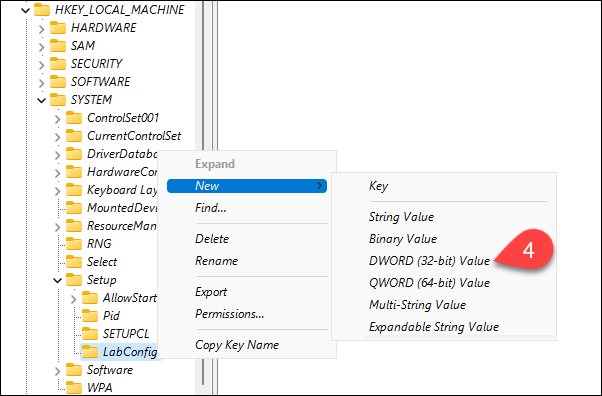
4. Right-click the newly created LabConfig item in the navigation menu on the left side of the window. Hover over the New option in the context menu, and select DWORD (32-bit) Value item.
When prompted, name the item BypassTPMCheck.
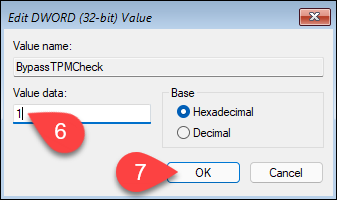
5. Right-click BypassTPMCheck value in the main window list. Select Modify in the context menu.

6. In the Edit DWORD (32-bit) Value dialogue box, change the Value data from 0 to 1.
7. Select OK.
8. Close the Registry Editor.
9. Click the back arrow to go back to the installation process.
Conclusion
After reading this article, you know how to use VMWare Workstation Player to install Windows 11.
The article also demonstrated how to bypass the TPM check preventing unsupported systems from installing the new Windows release.


No comments